This blog post features Salesforce Lightning Productivity Tips for End Users, specifically tips on how to efficiently find and work with records, how to leverage new Lightning features, and how to maximize your effectiveness using Lightning apps. The goal is to help you enhance your productivity while using Salesforce Lightning.
As we approach the 5-year anniversary of the release of the Salesforce Lightning Experience (LEX), we are now working with a platform that has not only caught up with Classic but has far surpassed it in terms of available functionality and new release updates. For those of you who might be new to Salesforce, the Lightning Experience is the newer user interface (UI) on the Salesforce Platform, whereas Classic represents the old UI. As of January 2020, Salesforce has turned on Lightning Experience through a Critical Update and is continuing to strongly advocate for LEX. Now is the time to embrace Lightning if you have yet to do so.
In my work both as a Salesforce Admin and Consultant, end users have strongly benefited from tips on how to enhance their productivity using Lightning. In fact, I was a Salesforce end user for several years before stepping into a technical position, which has enabled me to have a better understanding of end users’ needs. These tips will be quick wins for you, the end user, with little to no customization by your admin.
Table of Contents
- Finding and Working with Records Faster
- Pinning List Views Saves Clicks
- Kanban List Views for Efficiency
- Open Records with Split List Views
- Make Changes Quickly with List View Inline Editing
- Subscribe to Reports for Relevant Notifications
- Search to Find Records Quickly
- Usability Tips
- Favorites for Easier Access
- Display Density (Comfy or Compact)
- General Lightning App Functionality
- Utility Bar Provides Quick Access to Productivity Tools
- Customize Navigation Bar to Prioritize Your Items
- App Launcher to Find All Apps and Items
- Lightning Console App
- Pin Tabs for Frequent Access
- Customize Tabs to Better Identify the Record
- Console Shortcuts to Maximize Efficiency
- Standard-Navigation Lightning App
- Dropdown to Do More with Records
- Conclusion
1. Finding and Working with Records Faster
Pinning List Views Saves Clicks
List views are a great way to access records in Salesforce. Something to keep in mind is that in a list view, you can only access records and fields from the object whose tab you are on. In Lightning, there are a few features that you want to make sure to take advantage of.
Note: List views are often created by the administrator for your use. Depending on your access, you might be able to create your own list views or clone existing ones.
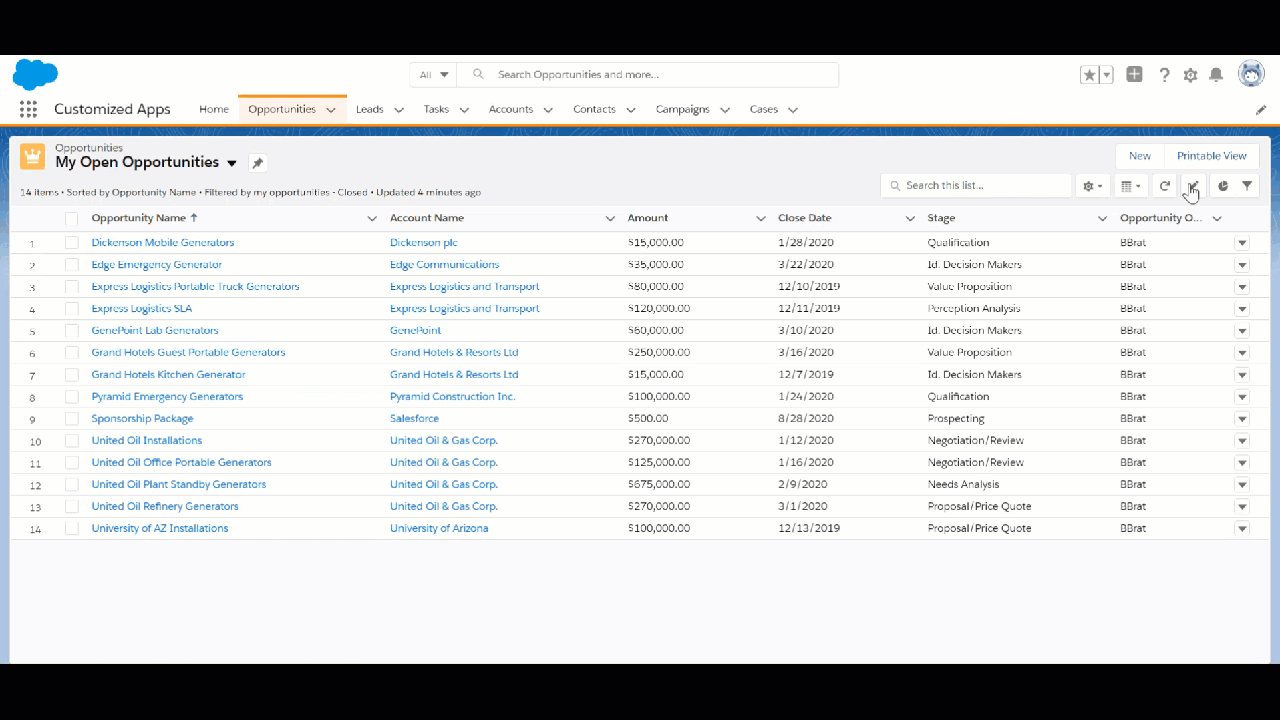
The default list view is the “Recently Viewed” list view. This has caused confusion more than once because users might not see any records or only a few (the ones they’ve recently viewed). To avoid seeing the “Recently Viewed” list view as your default, select your most frequently used list view and click the “pin” icon to pin that list view. After pinning the list view, it will open up as the default list view for that object from then on and save you several clicks each time.
Clicking on the cases tab, shows the “Recently Viewed” list view. We select the “All Open Cases” list view and pin it. Then we go to the home page and back to the cases tab and see the “All Open Cases” list view as the default.
Salesforce Help: Pin List Views in Lightning Experience
Kanban List Views for Efficiency
Another useful list view feature is the Kanban view. Per Atlassian, “Kanban is a popular framework used to implement agile software development. Work items are represented visually on a kanban board, allowing team members to see the state of every piece of work at any time.” The Kanban View is Salesforce’s implementation of the Kanban Board allowing you to visualize records as cards and easily update them, thus maximizing efficiency.
You can select a picklist and display it as a Kanban board, which allows you to edit the records by simply dragging them around. Click on the Display settings and select “Kanban”. Choose which field to order by and which field to summarize by.
We select “Kanban” in the “Display settings”. Next, we go to the “List View Control Settings” and select “Kanban Settings”. This is where you specify the fields to “Summarize By” and “Group By”. For the Opportunity list view, we select “Amount” and “Stage”. As you can see, the opportunities display as cards on the Kanban Board. The dropdown arrow allows you to edit, delete, or change the owner. The warning sign means you have no open activities and allows you to create a new task or event. By dragging the card to a different stage, you can easily progress the opportunity.
Salesforce Help: Configure the Kanban View
Atlassian Agile Coach: What is kanban?
Get Guidance on your Company’s Processes with Kanban Views
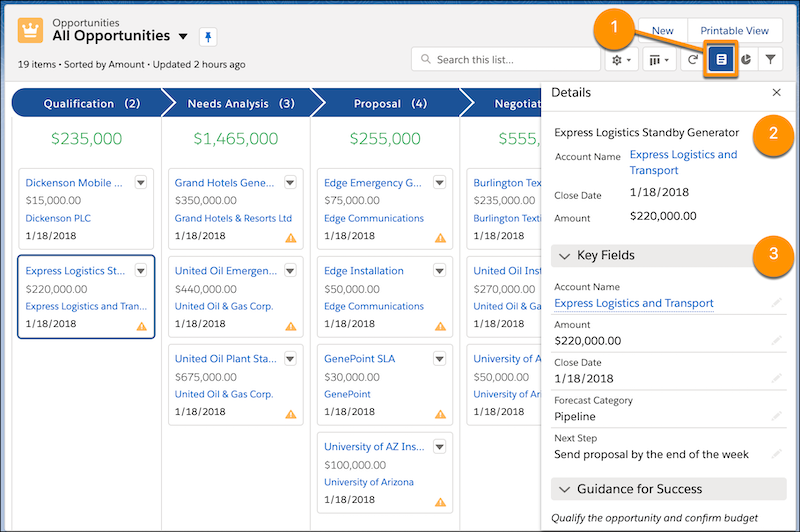
As of Summer ‘20, you can also access fields from the compact layout and key fields and guidance from your object’s path in the Kanban List View. Simply click on the details panel (1) and you will see the compact layout fields (2) and key fields and guidance for success (3) from the path. This update is quite useful because it allows you to see more information about the record without having to leave the Kanban List View.
Note: A path must be configured by your Admin in Path Settings in Setup. For more information, view this article.
Release Notes: Get Guidance on Your Company’s Processes in Kanban Views
Open Records with Split List Views
When using a Console App and as of Summer ‘20 a standard-navigation App as well, you have the option of displaying list views in “Split View”, which allows you to save both time and clicks by having records open and accessing the list view at the same time. Thus, you can open other records immediately, without needing to go back to the list view first. To do so, go to “Display Settings” and select “Split View”.
We select a cases list view, open it, and change the display settings to “Split View”. Then we use the split list view to select other cases.
Salesforce Help: Work with List Views in Lightning Experience
Release Notes: Work Through Lists with Ease Using Split View for Standard Navigation
Make Changes Quickly with List View Inline Editing
Though a feature not unique to Lightning, many people aren’t familiar with list view inline editing, so I wanted to highlight it. You can edit records directly in a list view, which can make you much more productive since you don’t have to open each record individually.
Note: If the object you are referencing has multiple record types, you need to filter by one record type in order to inline edit using a list view. There are also some fields that are not available or inline editing. For more information, please view this help article.
We click on the pencil icon in the top right to enable inline editing. Using inline editing, we edit the Opportunity Name, Close Date, and Stage of the opportunity. Don’t forget to save your changes once you are done.
Salesforce Help: Update Records Inline from a List View in Lightning Experience
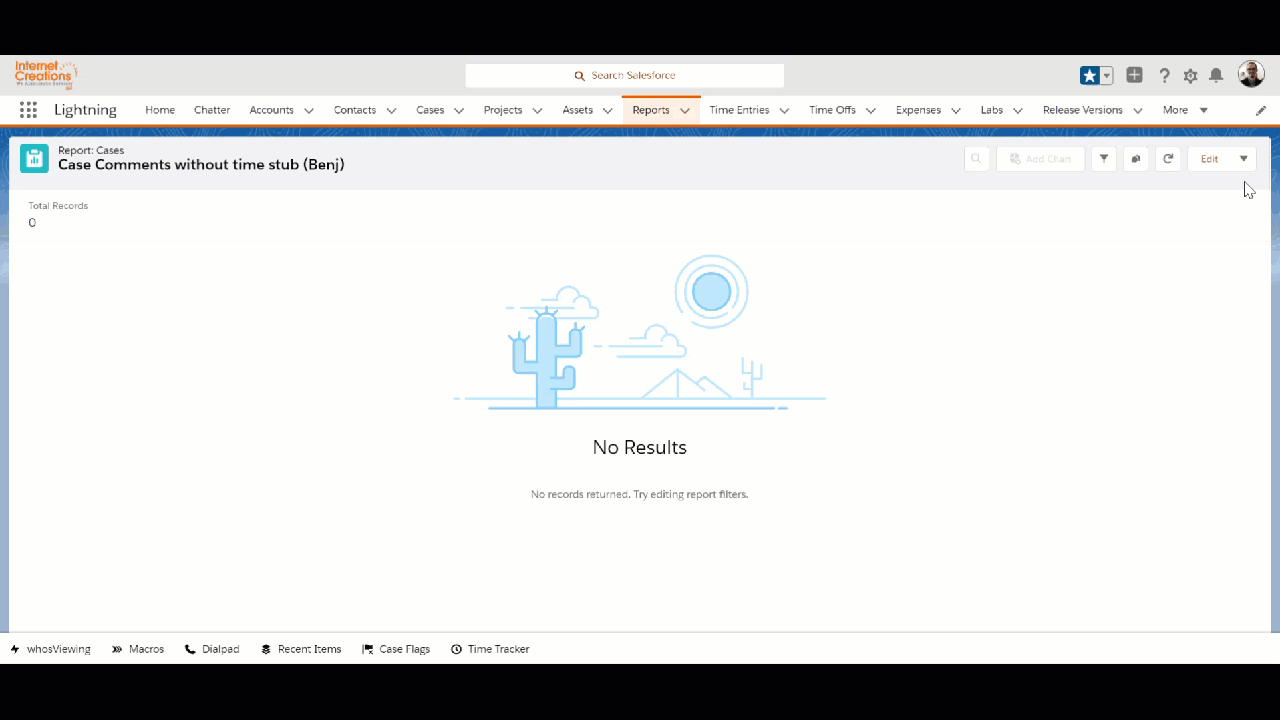
Subscribe to Reports for Relevant Notifications
A great way to enhance your productivity is to subscribe to reports. Rather than manually checking a report every day, subscribe to the report and set conditions so that you are notified when you need to take action or be aware of something. For example, I am subscribed to a report for Case Comments without time stub with conditions to only email me if the record count is greater than 0. By doing so, I am notified to remind myself to log time against the case that I worked on. Don’t forget to set a schedule for the report to email you. You can select the frequency, days, and time.
Note: You must have the “Subscribe to Reports” permission to do this.
In the report, we click the dropdown and select “Subscribe”. Then we show the Frequency options. Next, we select the Frequency “Daily” and Time “10:00 PM”. We check “Add conditions to this report” and set the conditions to be “Record Count Greater or Equal to 1”. Lastly, we save the report subscription.
Salesforce Help: Schedule and Subscribe to Reports
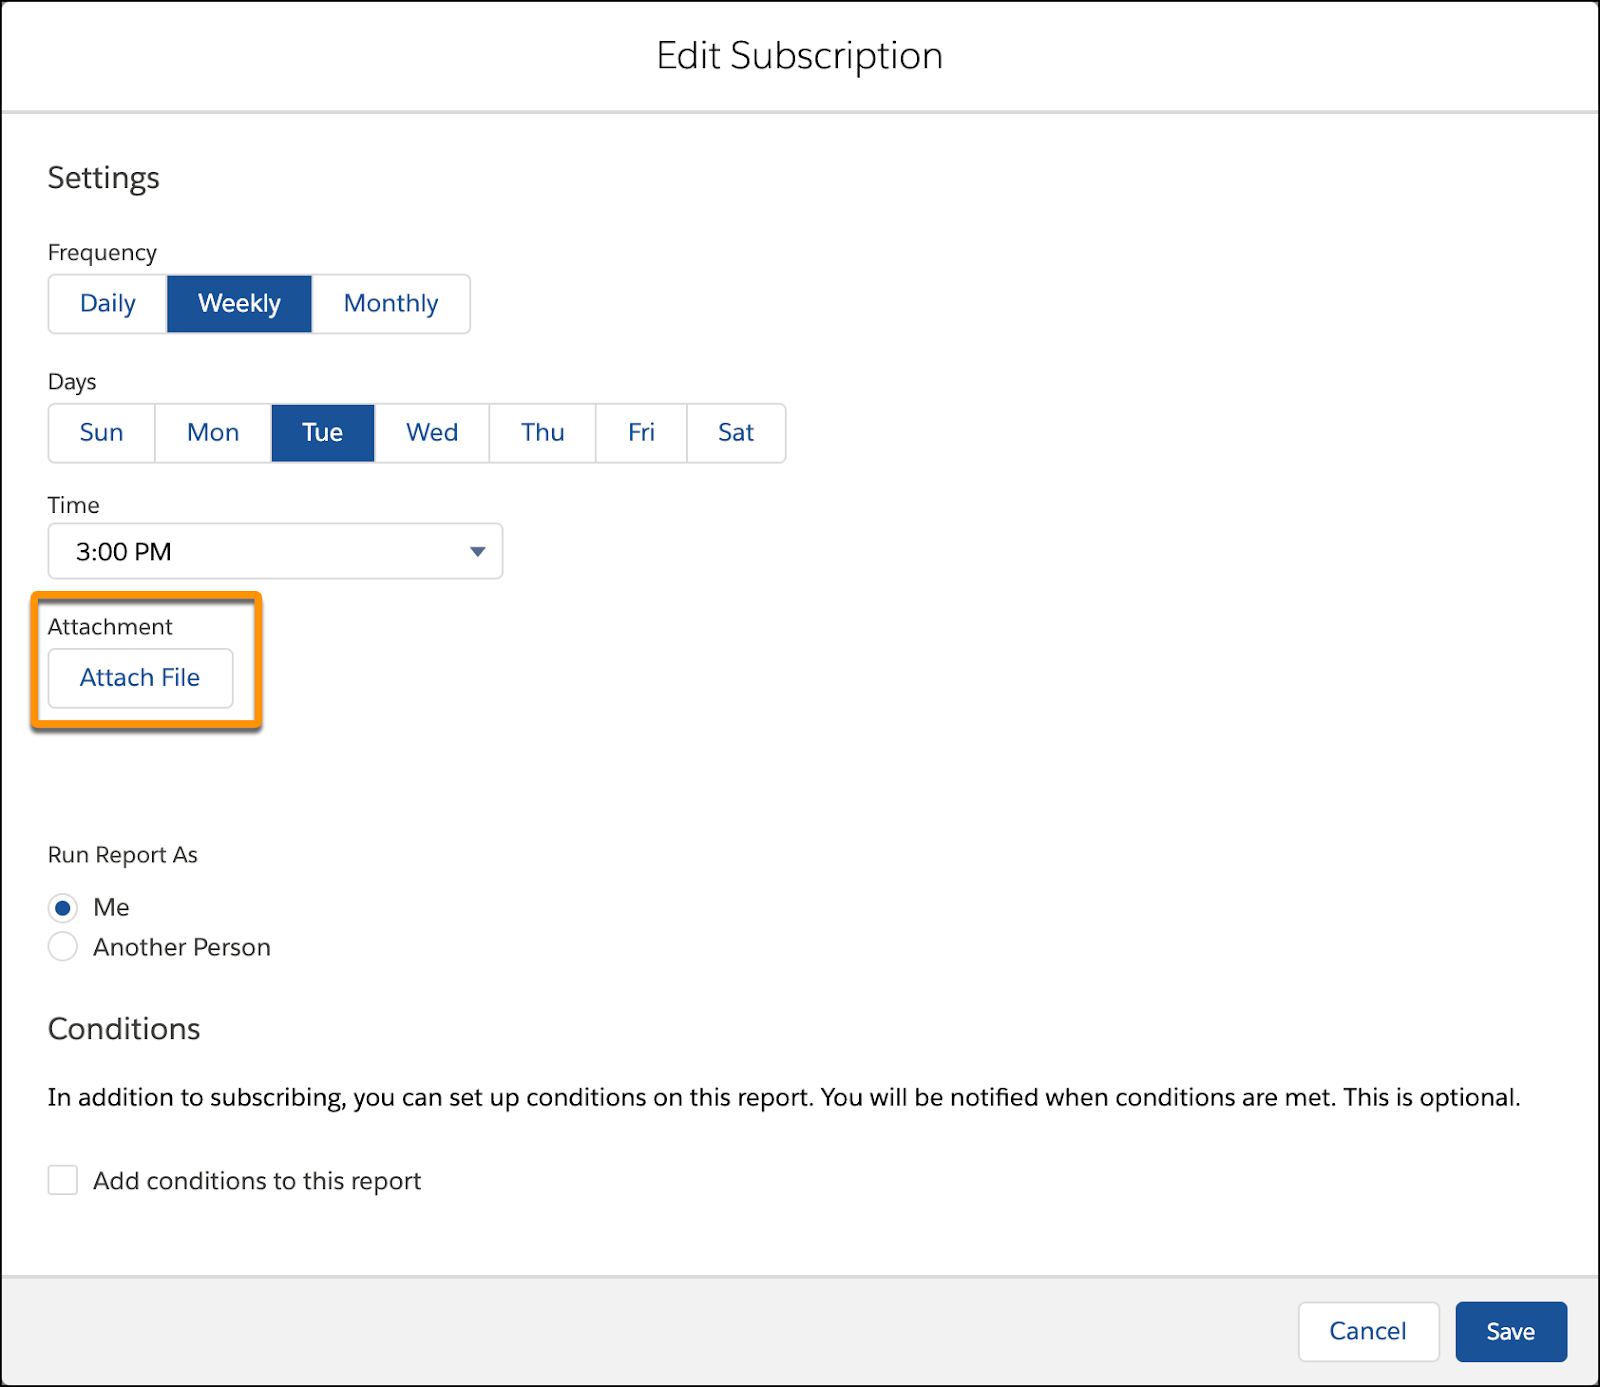
Attach Files to Report Subscriptions
Note: This feature must be enabled by an Admin. For more information, view this article.
As of Summer ‘20, you can now attach .csv files (Details Only reports) and .xlsx Excel files (Formatted Report) to report subscriptions. While setting up the report subscription, click on Attach File, select your Export View, and save. This feature saves you time if you want to access your data outside of Salesforce.
Salesforce Help: Attach Files to Report Subscriptions (Beta)
Release Notes: Attach .csv Files to Report Subscriptions (Beta)
Search to Find Records Quickly
Search is powerful in Lightning. If you need to find a record quickly or aren’t sure what object the information is on, use search.
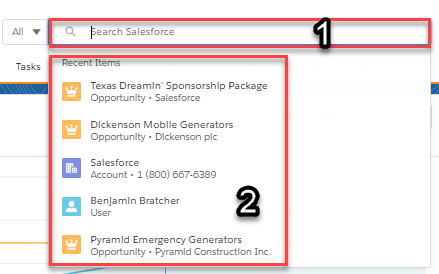
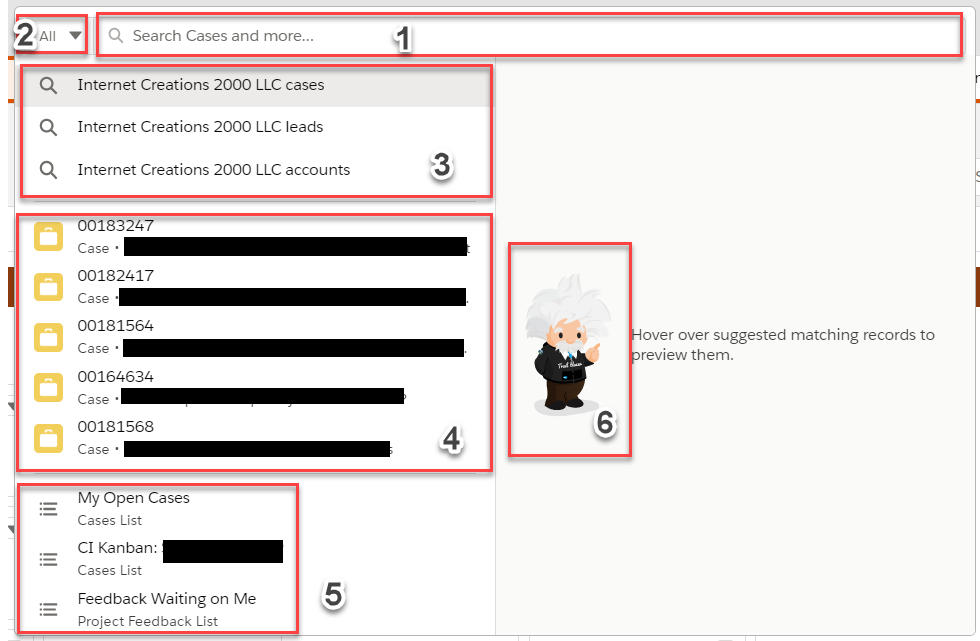
Search automatically shows the last five records (2) that were accessed when you click in the global search bar (1) on the top of the page.
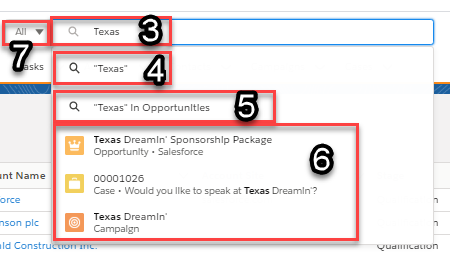
Once you start typing (3), several search options appear. The first search area will search for the keyword in the most used objects (4), the second search option searches for the keyword in the object that you are on (5), lastly, it will show you a limited number of results that meet the keyword (6). You can also use the dropdown beside the global search (7) to narrow down the search to any searchable object from anywhere in Salesforce. When you click enter, you will see the top results based on the keyword and the objects you use most frequently. To see more objects, search for the object on the left side bar.
Salesforce Help: Search for Records in Lightning Experience
Video: Search in Salesforce (Lightning Experience)
Einstein Search
Note: Einstein Search must be enabled by an administrator. For more information, visit this help article.
Now, with Einstein Search, Salesforce increases productivity with AI for every customer. Einstein Search can personalize results for every user, show relevant results from natural language queries, and let you take actions directly from the search bar for quicker time to value.
As you can see, the search options by default are a bit different than before. While you still have the Global Search (1) and Object dropdown (2), you now have three search selections (3) as well as five recently accessed records based on the object you’re on (4) as well as recently accessed list views (5). Seeing Einstein (6) is how you know that Einstein Search is enabled.
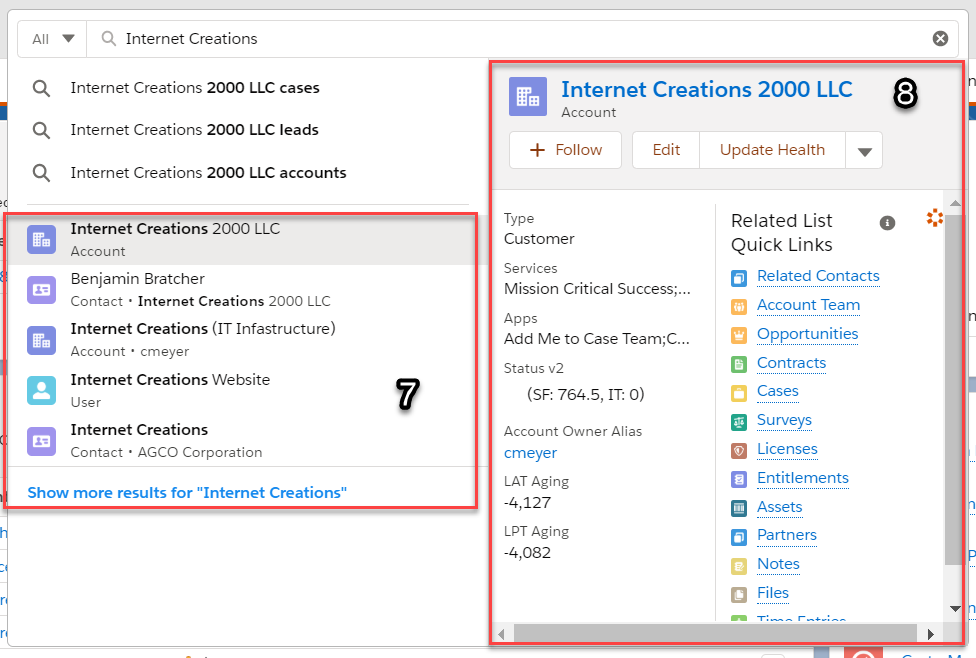
When you start typing using Einstein Search, several results show up based on the keyword with the option to show more results (7). If you hover over one of the results, it will show you information about the record including fields, actions, and related list quick links (8). You can now take action directly from your search results.
Salesforce Help: Search and Work Smarter with Einstein Search (Beta)
2. Usability Tips
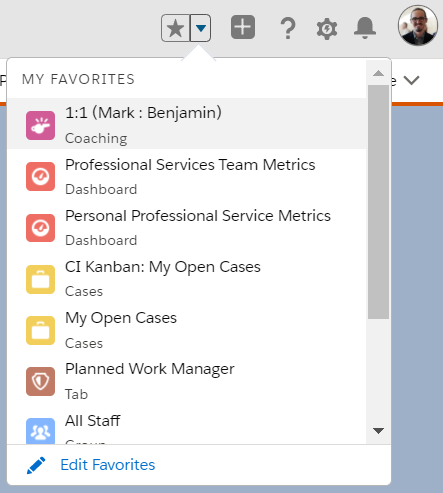
Favorites for Easier Access
Favorites is one of my favorite Lightning features (no pun intended), which allows you to mark certain records, dashboards, reports, etc. in order to quickly access them from any page (not available on setup pages). Whenever you favorite something in Lightning, it shows up in a special place in the list of reports, dashboards, and the navigation bar dropdown on standard apps. It is worth noting that not all content can be favorited (click here for more information).
We open the SolarBot Impact Dashboard and click the star icon to favorite it. Go to the home page and access the dashboard from the favorite dropdown beside the star icon.
For example, my favorites in Vicasso’s Salesforce org include a record to manage the 1-on-1 meetings with my manager, my team’s dashboard, my personal performance dashboard, my Kanban cases list view, my open cases list view, my planned work manager, our all staff group, and more.
Salesforce Help: Create Shortcuts to Salesforce Pages with Favorites
Display Density (Comfy or Compact)
You have the option to change the display density settings of the detail fields on records. Your choice is between Comfy (field label above the field value) or Compact (field label beside the field value).

As you can see, the compact density setting condenses the fields, so that you can see more details in one area. To change the density setting, go to your profile photo in the top right and select the density setting.
We click on our profile icon on the top right, go to display density and change the the Display Density to “Compact”. We confirm to refresh now. Then we change the Display Density back to Comfy and refresh now.
Salesforce Help: Personalize Lightning Experience Display
3. General Lightning App Functionality
Utility Bar Provides Quick Access to Productivity Tools
Note: The utility bar depends on the configuration your admin has set up. If you do not see some of these features, submit a request to your admin to set it up. For more information, visit this help article.
The purpose behind the utility bar is to give users quick access to items that are frequently accessed. The utility bar can be configured differently for each application. Some examples for useful utilities include notes, macros, history, recent records, CTI softphone, omni-channel, custom solutions, and more. The utility bar is at the bottom of your Salesforce app in Lightning. Keep in mind that several of the applications mentioned (such as macros, CTI softphone, and omni-channel) apply to support agents more than other types of users.
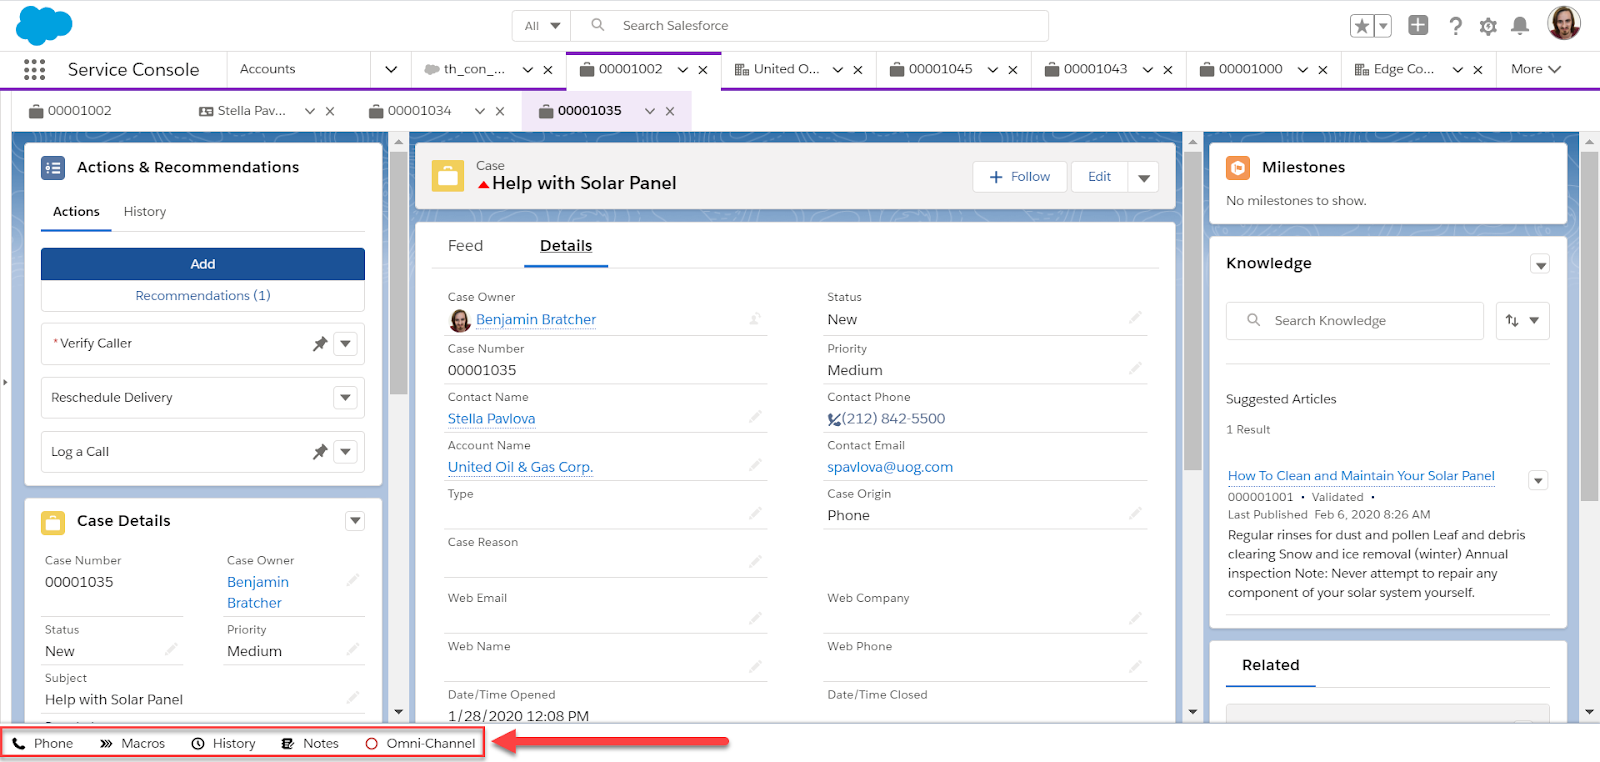
In the screenshot, you can see that the utility bar (bottom left) is configured to show the phone, macros, history, notes, and omni-channel utilities.
Salesforce Help: Add a Utility Bar to Lightning Apps
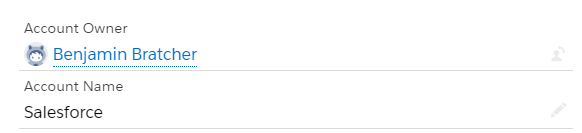
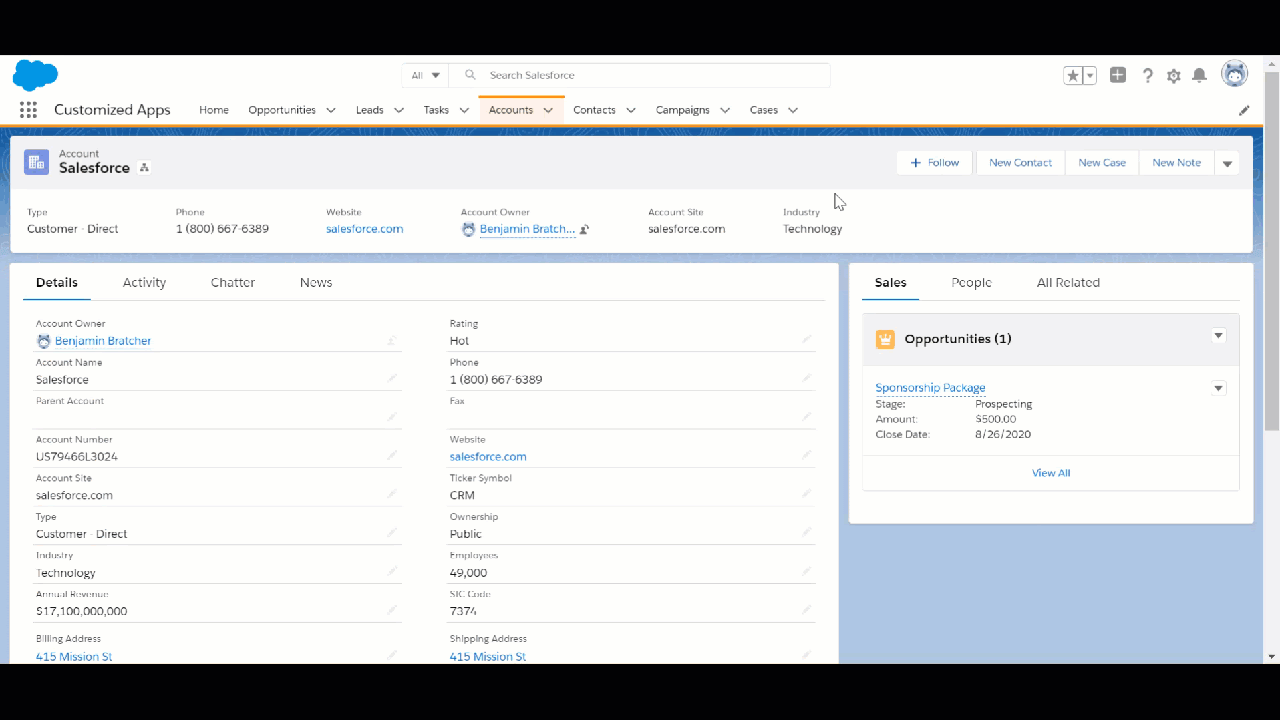
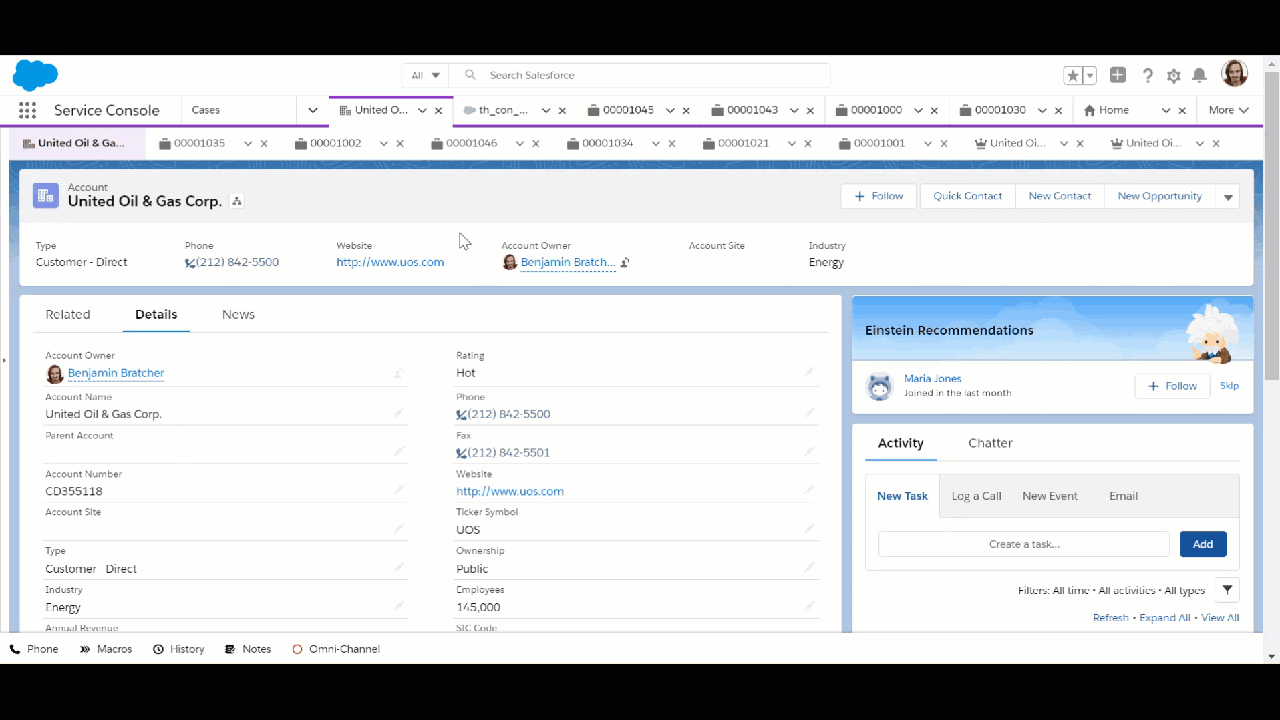
Customize Navigation Bar to Prioritize Your Items
An admin configures your apps for you and selects what objects are available in your navigation bar. While you cannot remove what they have selected, you can rearrange the order and also add additional items (e.g. objects or records) to your navigation bar. For example, if the dashboard tab is not in the navigation bar and you need to access it frequently, you can simply add it. There are many ways to customize the navigation bar and prioritize items that you frequently access.
We click on the pencil icon to customize the navigation bar. Next, we rearrange the account object to be in the front, add our favorite opportunity (Sponsorship Package), and add Chatter. Once that is completed, we save the navigation bar. Next, we click on the dropdown on account, open the Salesforce account record in the navigation bar, and save it to the navigation bar. Then, we go to the App Launcher, search for Dashboards, open it, and add it to the navigation bar. Finally, we click on the pencil icon again to customize the navigation bar and “Reset Navigation to Default”.
Salesforce Help: Personalize the Navigation Bar in Lightning Experience
App Launcher to Find All Apps and Items
The App Launcher recently got an upgrade in Salesforce. Instead of taking up the entire screen, it now only shows a small dropdown when clicked. The App Launcher allows you to select the apps you want to use and gives you access to all items and objects. If you can’t find what you want in the navigation bar, click the App Launcher icon in the top left and search for it. You can also click “View All” to see all available apps and items.
We click on the App Launcher and search for “Lemonade” and open the “Lemonade” app. Later on, we open the App Launcher again, search for “Dashboard” and open it.
4. Lightning Console App
The Lightning Console App enables you to view multiple records and their related records on the same screen in different tabs. You can easily switch between different records, which is useful in a fast-paced environment. For more information, visit this help article.
Pin Tabs for Frequent Access
When using a console app in Lightning, there may be certain tabs that are very important or that you access quite frequently (e.g. important records, the homepage). To have the tab stay in that place, you can pin it by clicking on the arrow and selecting “Pin Tab”.
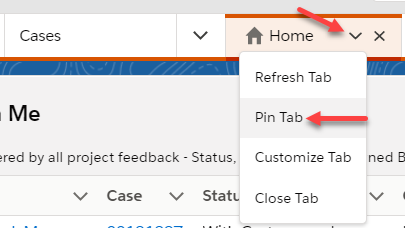
Click on the arrow on the tab and select “Pin Tab”.
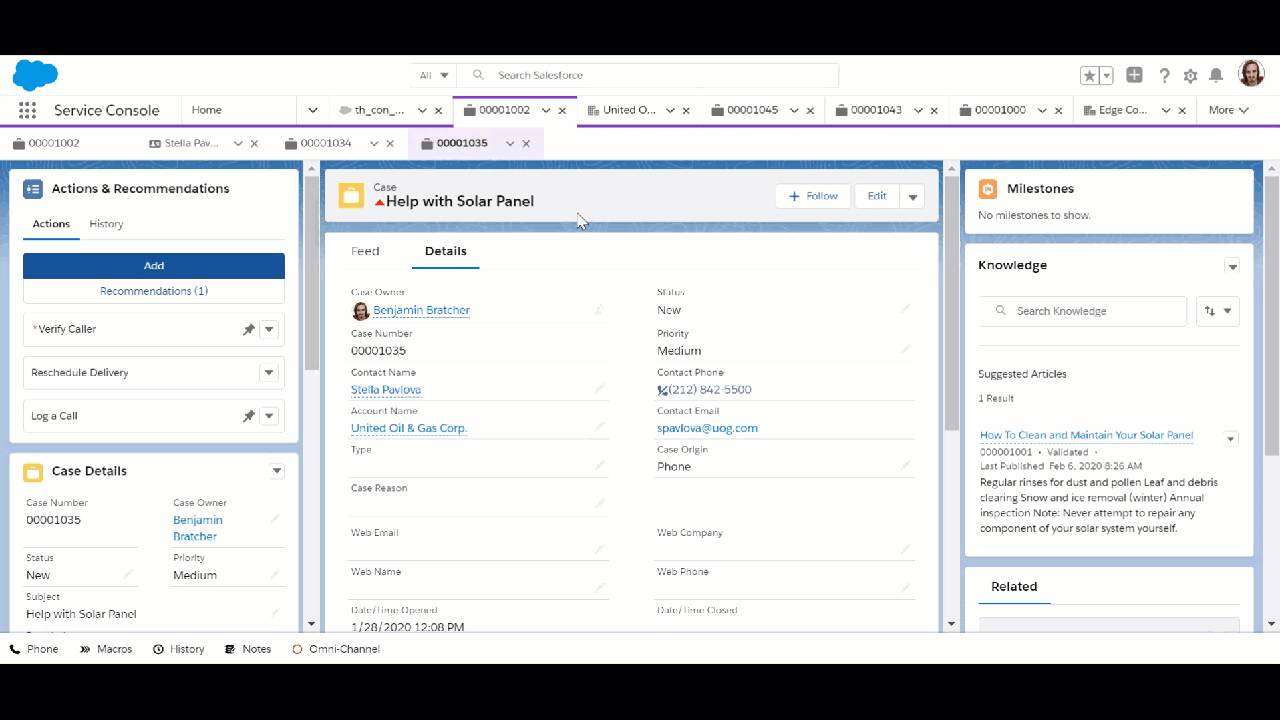
Customize Tabs to Better Identify the Record
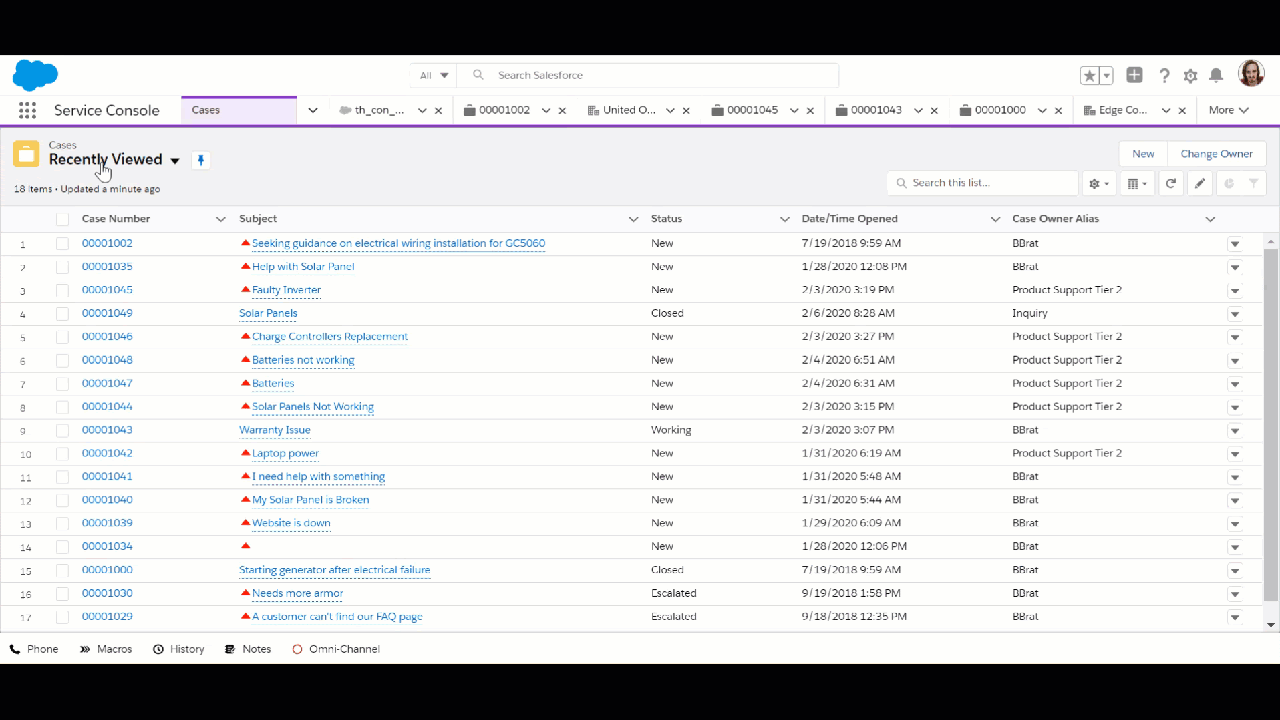
When you are working on records in the console, it can quickly become difficult to distinguish what record you are wanting to open, especially when they have auto numbered names (e.g. cases). By utilizing the “Customize Tab” feature, you can change the name and the icon of the tab to more easily identify the record you are wanting to access.
In the console app, we have opened several cases for United Oil & Gas. It is difficult to distinguish between the different cases, unless you memorize the case numbers. We decide to customize the “Help with Solar Panel” to display “Solar Panel – 00001035” and an icon that looks like solar panels instead of “00001035” and the case icon.
Salesforce Help: Salesforce Console in Lightning Experience
Console Shortcuts to Maximize Efficiency
When using a Lightning console, you can use certain shortcuts to enhance your productivity. The list of shortcuts is quite long, but here are a few of my favorites.
CommandDescriptionShortcutClose or deselectClose or deselect a window.
You can’t close some windows and dialogs with this shortcut.EscEditEdit a record.
This shortcut doesn’t work with Lightning Knowledge articles, reports, dashboards, feed items, approval requests, and email messages.eSaveSave a record.
Your focus must be on a field.Windows: Ctrl+s
macOS: Cmd+sSearchPlaces your cursor in the search box./Switch tabsSwitch between workspace tabs and subtabs.
To switch, your focus must be on the tab itself.Left Arrow or Right ArrowClose workspace tabCloses the current workspace tab, including its subtabs.Shift+xClose all tabsCloses all unpinned tabs.Shift+wRefresh tabRefreshes the current workspace tab, including its subtabs.Shift+r
These are only a few shortcuts that I thought would be the most frequently used. However, if you click on the help article below, you will find a long list of shortcuts. If you can learn all of these shortcuts, you will become a Lightning Console Master!
Salesforce Help: Keyboard Shortcuts for Lightning Console Apps
5. Standard-Navigation Lightning App
Lightning Apps with standard navigation allow you to view one record at a time, but display the objects in the navigation bar on the top of the page for easier access. For more information, visit this help article. For more information on how console apps differ from standard-navigation apps, visit this help article.
Dropdown to Do More with Records
In the navigation bar of the standard-navigation Lightning App, you can use the dropdown arrow to do the following:
- Create new records
- Access favorite records
- View recent records
- Open recent list views
Rather than having to open the object, select the list view, and find the record or use the global search to find the record, you can click the arrow and quickly access it. This saves you several clicks every time you want to access a favorite record, recent record or list view, or create a new record.
We access our favorite case, recently accessed account, and create a new lead all using the dropdown on the tabs in the standard Lightning app.
Salesforce Help: Lightning Apps
Conclusion
In conclusion, I hope these Salesforce Lightning Productivity Tips for End Users will help you enhance your productivity as an end user while using Salesforce Lightning. Take the time today to study these Lightning tips in order to save time and increase productivity in the long run. If you are new to Lightning or will soon be making the move, I hope these tips have you excited and ready to take on Lightning.
For further learning, I have curated the “End Users: Enhance Your Productivity In Lightning” Trailmix on Trailhead for you to enhance your productivity with Lightning Experience features. Happy Trailblazing!
For more information on making the transition to the Lightning Experience and how it boosts business productivity, check out our previously recorded webinar “Why Lightning? Why Now?”.